
Test blueprints
Working with a source blueprint
A source blueprint is a blueprint used as a basis from which to copy new blueprints. A source blueprint is where you collect all the questions you have for a given course or exam. You distribute these questions across rules in the blueprint by theme and level. Whenever you need a new exam, you ‘pull’ a new blueprint for it out of the ‘source blueprint’. The new exam is called a ‘variant’ in Remindo and is visually linked to the ‘source blueprint’ in the exam overview.
Working with a source blueprint has the following advantages:
- It saves time. You will no longer have to compose an entirely new blueprint and manually add questions every time there’s an exam.
- It spares you looking through the item bank. Whenever you create new questions in the item bank, you can just add them, once, to the source blueprint.
- Every time you save a set of questions into a copied blueprint, Remindo will select which questions to use on the exam. Remindo automatically tracks which questions have been used on exams least often and selects those.
-
Step 1
- Create a blueprint. See Blueprint: create.
-
Tip! When you use a source blueprint, be sure to go into the Delivery settings and select the option ‘Never deliver this blueprint to student view’. That makes is clear to everyone that the blueprint is a source blueprint and will prevent it from accidentally ending up in student view.
-
Step 2
- Add rules for the questions. See Blueprint: adding questions.
- Give the rules names so you know which questions should go in which rules. Use the pencil icon in the rule. See Blueprint: rule options.
- Add the questions to the appropriate rules.

-
Tip! If you want to be even more efficient with your use of the item bank and source blueprints, you should create as many subcategories in the item bank as you have rules in your source blueprint. Have each subcategory correspond to the theme of a single rule. Now, instead of selecting individual questions, you can add an entire subcategory to each rule. The advantage there is that questions you later add to the subcategory will automatically be added to the appropriate rule in your source blueprint. See Blueprint: adding questions.
-
Step 3
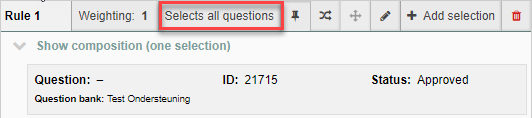
- For each rule, select how many questions on that subject should appear on the exam. Use the button Selects all questions to do that. See Blueprint: rule options.
- Click Save blueprint when you have finished adding questions.
-
Step 4
- From now on, you will be able to ‘pull’ exams from the source blueprint. There are three different options to choose from to create a ‘variant’:
- Copy all settings and dertermine a fixed set of question
- Copy all settings and determine a fixed set of questions while maintaining the current Rules.
- Copy all settings and combine Rules
Find more information on the various settings and how to create them here.

- From now on, you will be able to ‘pull’ exams from the source blueprint. There are three different options to choose from to create a ‘variant’:
-
Step 5
Furthermore, you will also be able to ‘pull’ exams from the source blueprint. Do this from the Preview screen by pressing the Generate a new set of questions button to create a new combination of questions each time.
Save this new set of questions as a new blueprint by clicking the Save question set to new blueprint button. See Blueprint: copying a set of questions.
Exmaple: If three questions are selected from a Rule with the questions A, B, C, D, and E, one student will be presented with questions A, B, and D, while another student will be presented with questions B, D, and E.
Do you want all students to be presented with the same questions? Create a variant with a fixed order of questions (see step 4).
-
Please note! Remember to give this new blueprint a different name than the source blueprint.
-
Tip! Are you using a source blueprint that you don’t want to be used as an exam in itself? Go to Settings on extradition and choose ‘Never extradite this blueprint to the student view’. This way, you will make sure your source blueprint remains just a source blueprint.