Test questions and question bank
Creating a new question
In this item, we will explain what steps must be taken to create a new question in Remindo. We will also cover some of the settings that will require configuration in (nearly) every type of question.
-
Step 1
- Log in to admin view and go to Tests.
- Select your faculty.
- Under Categories, select the course you want to create a new question for. The course you select will be highlighted in yellow. New questions will be added to that course’s item bank.

-
Step 2
- Click Add question (top right corner of the screen).
-
Please note! The Add question button will not work until you have selected the course to which your new question should be added.
-
Step 3
- A new screen will open (see image).
- Select the form of your question under Type of question. A multiple-choice question was chosen for the example.
- Enter the name of your question under Code.
- If you set the options Available for use in paper exams, Available for practice and/or Available for exams to No, the question will be unavailable for those uses. For example, questions made unavailable for exams cannot be selected when designing an exam (see blueprint).
- Language: choose whether the question should be denoted as Dutch or English by using a flag.
- Under Show calculator aid?, select whether the student will be allowed to open the calculator while performing the exam. Choose whether they will have access to the simple or the scientific calculator. Please note! These settings can be modified during the creation of an exam: the global exam settings will override settings in the question. See Blueprint: create.
- Click Add when you have entered and checked everything.

-
Tip! Give the question a name that makes sense in the Code field. You could use the subject of your question, for instance. This will make it easier to find your question again later using Remindo’s search function. Besides, questions without a unique name cannot be distinguished from each other in the Learning Analytics (test analysis in Student view).
You can also add properties to the question to help identify it later. In Veterinary Medicine, the questions were tagged based on species and/or organ system.
-
Tip! When editing (see step 4 below) you can add another ‘question type’ when using the multiple-choice question and the matching question.
- If you ‘add question’ and choose the (a) multiple-choice question with one correct answer, you can still switch to the (b) multiple-response question with multiple correct answers or the (c) multiple-response question with multiple correct answers (limited) in the editor. Switching from (b) to (a) or (c) is also possible.
- If you ‘add question’ and choose the matching question, you can set up the following variations in the editor: only one connection is possible in the entire matrix; only one connection is possible per row/column; multiple connections per row/column are possible.
-
Step 4
- You will come to the Edit question screen to enter your question (stem and answer options).
- Each type of question in Remindo has characteristics and settings that are specific to that question type. These specific settings are described in the section on that question type.
- A number of settings are common to (almost) every type of question. These settings are briefly discussed below, using the example of a multiple-choice question.
-
Step 5
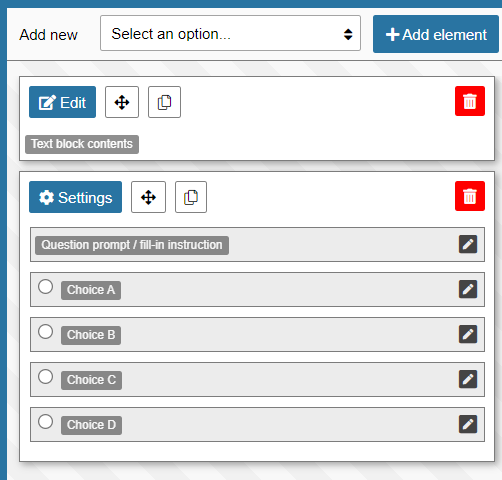
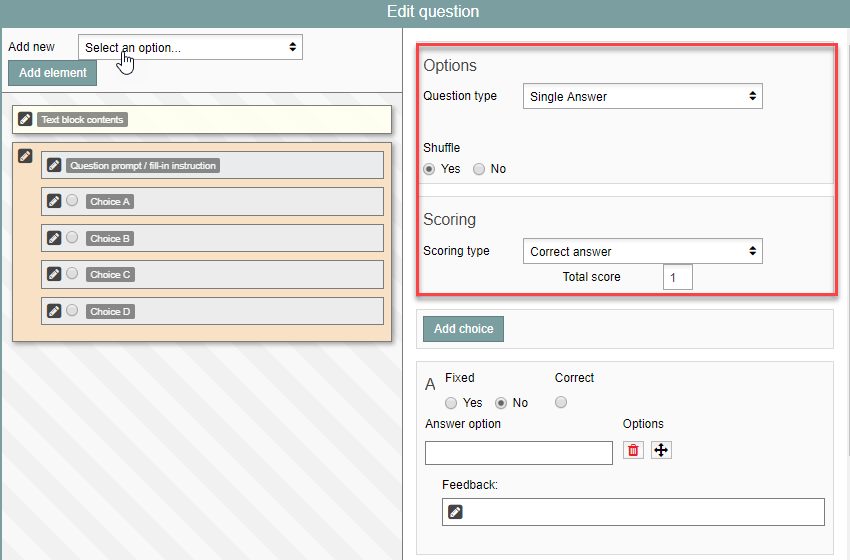
Question stem: Each question type has two fields for entering the stem of the question. These fields contain brief hints about how to construct or use the question. The first field, with the text ‘Text block contents’, appears in nearly every type of question (see next image). The second fields differs between question types; here, with a multiple-choice or multiple-response question, it says ‘Question prompt/Fill-in instruction’.
Enter question stem: Click on ‘Edit’ where it says ‘Text block contents’, or on the pencil on the right where it says ‘Question prompt/Fill-in instruction’.
A text edit box will activate on the right side of the screen. Enter the question stem into that box.Answer options: Multiple-choice questions, multiple-response questions, sorting questions and matching questions require that you enter answer options.
Enter answer options: Click the pencil icon to the left of the answer option. Enter the answer option in the text edit box to the right. When you click the next option, the previous one will be saved automatically.
You have to enter the correct answer along with the other answer options. You will indicate which one is correct later on.
Please note: If you prepare your questions in Word, be aware that Remindo will retain Bold and Italic formatting when you paste text in. If you used that formatting to mark your correct answers in Word, you will need to remove it in Remindo. Remindo will not retain Underline, Highlight or coloured text formatting.
-
Please note! The box containing the text ‘This is the standard text’ does not exist when choosing the text-entry question, due to the specific way in which this question type is designed. The box containing the text ‘which is the correct answer?’ does not exist for each question type due to the specific ways in which these question types are designed.
-
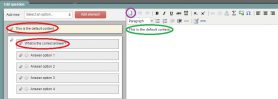 Tip! Remove the placeholder texts ‘This is the standard text’ and ‘Which is the correct answer?’ with a single click by clicking the empty page icon at the top left corner of the text edit box (see purple circle).
-
Step 6
Indicate correct answer and configure scoring.
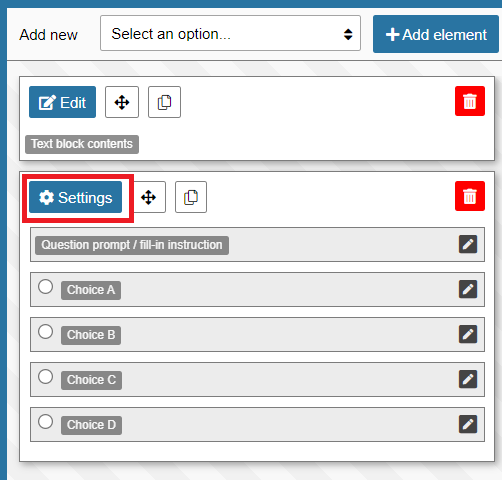
- To indicate the correct answer and configure the Scoring for the question, click on ‘Settings’ (see image).
-
Please note! During the exam, Remindo does not automatically show the number of points to be obtained per question. If you want to communicate the number of points to students during the exam, you should indicate how many points a question is worth in the question text, while creating the question.
The number of points to be obtained in the whole exam can be found on the page Introduction to blueprints and guide to blueprint functions, under ‘Preview’.
-
Step 7
A new screen will open.
Field: Options
- Under Question types, you can switch between a multiple-choice question with one correct answer to a multi-response question with multiple correct answers (limited) (and vice versa)
- Under Shuffle, indicate whether the order in which the answer options appear should be shuffled during the exam (only applies to multiple-choice, multiple-response and matching questions).
- Please note! Disable shuffling of answer options when the question is true/false, concerns a numerical sequence or involves some other logical sequence that should appear in a set order.
Field: Scoring
- You can use various types of scoring in Remindo, depending on the type of question. Click here to see a brief description of the different score types. They are: correct answer, score distribution, product rule and quotient rule.
- You can also see question scores when clicking on Scoring. Depending on the question type and type of scoring, you can fill in and view the following scores: Standard scores, Basic scores, Minus scores, Total scores, End scores, and Bonus scores. For more details on the scores per question type, please click here.
-
Step 8
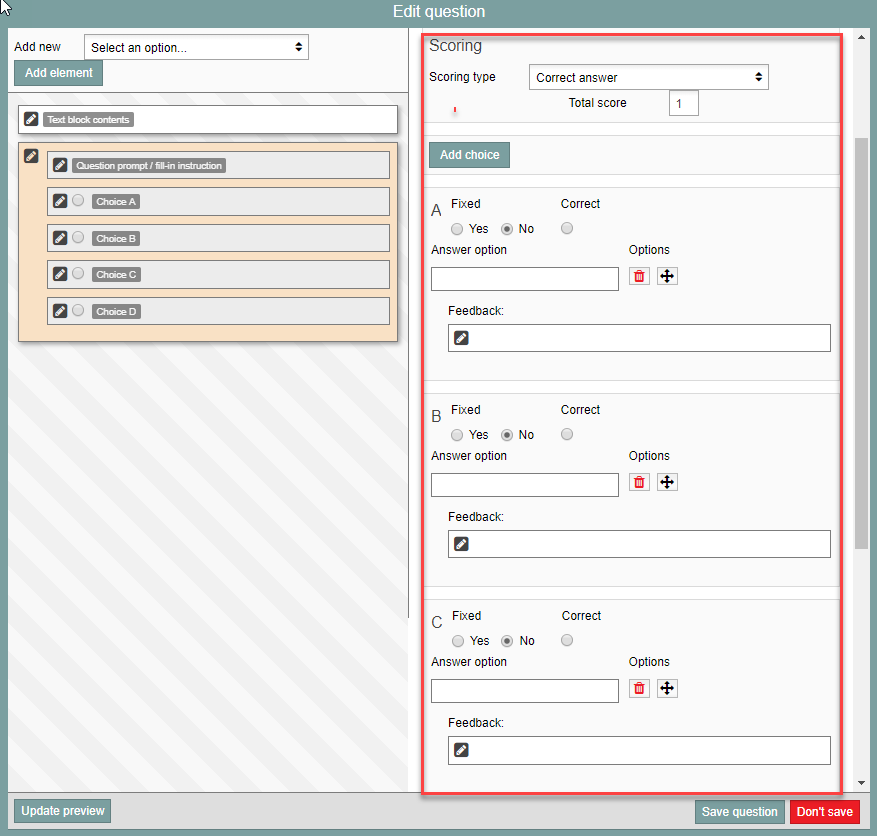
Indicate which is the correct answer by checking the box Correct next to that answer option. In a multiple-response question, multiple answer options can be marked as correct.
For each answer option, you can use the Fixed option to ensure it appears in a set position. The other options will still appear in random position.
Feedback can be added to each of the answer options in a multiple-choice or multiple-response question. The candidate will see this feedback if they are allowed to see the results.
Offering General feedback: instead of providing feedback for each answer option separately, you can provide general feedback for when the candidate offers the correct answer and for when they get (parts of) it wrong. This is possible for all question types.
Use the Add choice button to add extra answer options. Matching questions have Add row and Add column buttons.
You can remove answer options with the trashcan icon to the right of each.
Please note! Disable shuffling of answer options when the question is true/false, concerns a numerical sequence or involves some other logical sequence that should appear in a set order.

-
It is possible for the student to open a PDF file given in the feedback (both feedback per answer option as well as general feedback on the question) with practices and practice tests. The PDF can be added to the feedback as you would add it to a question itself (see here for more information on adding multimedia).
-
Step 9
- Adjust the order in which the answer options appear by dragging them around with the arrow buttons.
-
Step 10
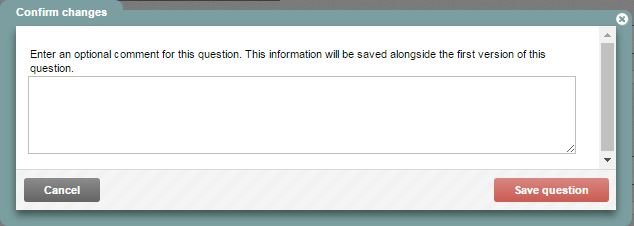
When you have configured everything, click Save question in the bottom right of the screen. By default, you will see a pop-up message asking for a description of the changes you made to help with version tracking. Enter such a description if you wish, then click Add question. The question has now been created and can be found in the item bank.
If you have already saved this question before, you can also save it as a new copy instead.