Results
Results: editing the caesura after exam performance
When the provisional grades (with the set ceasura) are known after an exam performance, it is still possible to make adjustments. For example, it is possible to edit the answer key or the ceasura.
It is recommended to first research if there are any valid arguments to edit the answer key after exam performance:
- Are points awarded to an incorred answer?
- Are multiple answers correct in case of a multiple-choice question?
- Was the formulation of a question vague which resulted in multiple interpretations?
- Was a question corrected to severely or to leniently?
After that, you can discuss whether it is necessary to edit the caesura. Make sure that you have valid arguments to do so. For example, was the exam too difficult/easy for the students’ level? Do you want to apply the Cohen-Schotanus method? (An explanation of this method can be found under step 1 on this page.)
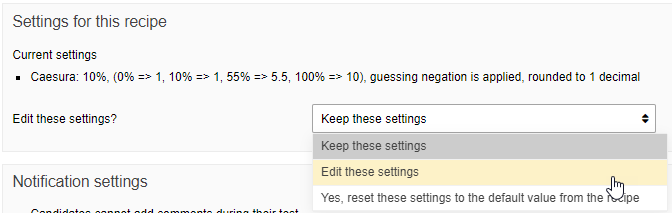
If you want to edit the caesura, please inform your key user. He/she can configure the new settings for you.
You can also edit the settings yourself, if you are added as supervisor to the test moment. You can read how to do this from Step 2 onwards.
Has the exam not been performed yet? In that case, you can still edit/set the caesura yourself. For more information on that, please read this page.
-
Note: When you follow the steps below to edit the caesura, the changes will only be made to the caesura for that test moment. If you have more than one test moment with the same blueprint for which you want to edit the caesura, but you do not want to edit the caesura in the test blueprint itself, you will have to make the changes to each test moment separately.
-
Step 1
Applying the Cohen-Schotanus method after the performance of an exam.
(New function in Remindo since 21 April 2018)The Cohen-Schotanus method looks at the maximum score obtained for that particular exam. Subsequently, you can distribute the grade ‘10’ to those students with the best scores, which automatically adjusts the caesura for the other students as well.
Before the performance of the exam, you must set a caesura (pass/fail): see the image below for a caesura of 50% under blueprint settings. Only after the performance of an exam is it possible in Remindo to apply the Cohen-Schotanus method, as this method uses the established scores as a basis.
The Cohen-Schotanus method then divides the exam scores up into percentiles (1 out of 100). When an exam score falls in the 60th percentile, that mean that 60% of the students scores lower than this particular student.
For example: Students score really bad on a particular exam (perhaps because the exam was too difficult). The highest scoring student has obtained 69% of the total amount of points. See the image below (in Dutch): A score of 69% is equal to the 95th percentile, or in other words: 95% of the students obtained a lower score than 69%.
If the 95th percentile is selected when you are applying the Cohen-Schotanus method, all students who obtained 69% on this exam, will receive a 10 as their grade. In other words: 69% of the total amount of points will be equal to the highest grade possible for that exam.
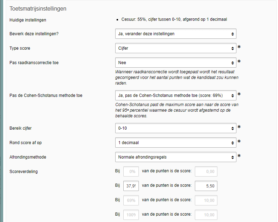
The screenshot (in Dutch) shown below shows a caesura before (without applying the Cohen-Schotanus method) and after (with applying the Cohen-Schotanus method).

Important! If you want to apply the Cohen-Schotanus method after the performance of the exam, please notify your key-user. They will set the desired percentile for you.
-
Step 2
Editing the caesura of a test moment (if you are a supervisor)
- Go to the test moment for which you want to edit the caesura in the Planning.
- Click on the icon to edit the subscription settings.

-
Step 3
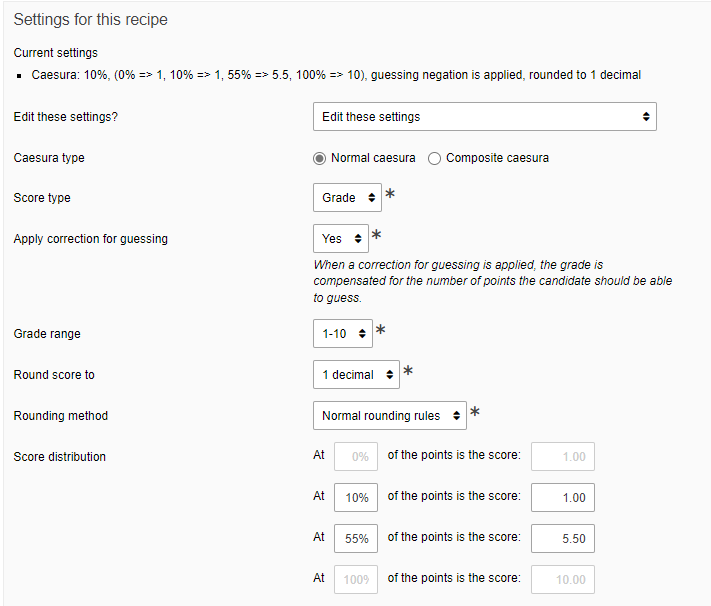
- Click on ‘Edit these settings’ under Settings for this blueprint.
-
Step 4
- Make the desired changes to the caesura.
- Do not forget to click on Save and close.
The caesura for that test moment has now been edited.